There’s no such thing as scrap clay – well not for me – I find so many things to do with clay left over from projects I rarely have much scrap.
If you make items to sell it may not be economical to look for ways to use scrap. However, if you do this for pleasure like I do, and make items on a small scale you might find working with your scraps helps fuel your creativity.
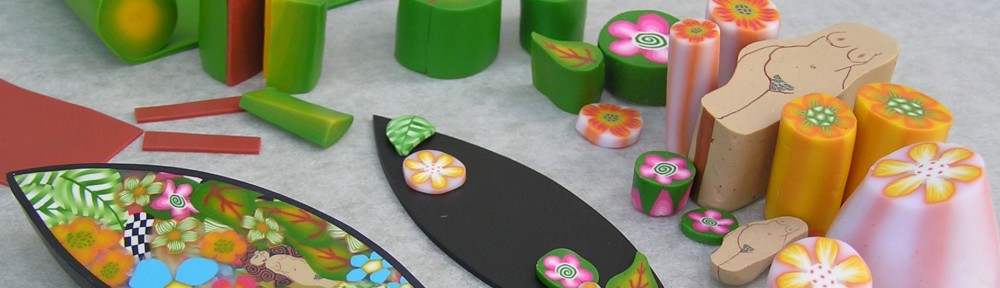
Here I make suggestions for all levels of scrap, from left-over canes to those muddy clumps of clay.
Here’s my video of the ‘Totem’ / Micro-Natasha technique mentioned below. [I’ve heard since that the term used for this technique is ‘scrap-scape’]
Left-over canes
Kaleidoscope canes

Kaleidoscope canes are great if you have excess canes, or have canes you just don’t like. To get the repeated pattern, all components need to be consistent for the length of the cane, so are good for canes you have no more use for – even canes you think are ugly can look great when combined in a kaleidoscope cane. You can also add long ‘sausages’ or strips of a color. You’ll find a lot of tutorials for these, or See my steps in making a kaleidoscope cane from left over canes and also here.
Ugly canes – beautiful results
Ron Lehocky has made tens of thousands of polymer clay hearts to raise funds for Kids Centre in Louiseville, which provides health services to children. He relies on people donating polymer clay they don’t want. By using an extruder (sometimes with the core attachment) he makes some ugly canes into works of art.

Cane ends and ‘interesting’ scrap
Make a scrap cane
Make a pile of the ends you trim off your canes, or lengths of cane too short to use for anything, and put them on top of each other with the ‘pictures’ facing up. Start more than one pile, grouping colours that work together. Compact the cane into a log shape, so that you have a new cane with most of the images facing the end.
Cover beads with thin slices, or place your slices side by side to show a mirror image, as I did for this bracelet.


‘Totem’ technique / micro-natasha
This is my friend Donna’s name for the wider slices. I’ve heard the finer pattern referred to as “micro-Natasha” technique. Kathy Dummer has lovely examples on her Flickr site. You can make the patterned ‘fabric’ or wider ‘totem’ patterns for earrings etc. You can use any scraps – left-over canes, cane ends, scraps of skinner blends or scraps of various colors – or a combination of all of these.


See more earrings made with this technique.
See my video at the top of this post for more about this technique.
This is a further explanation of something I mention at the end of the video – there is more interest in the centre of the twisted log, so it’s worth cutting earrings from the middle and leave the sections nearest the edge for making the ‘fabric’. Here is an example of a slice taken from the edge (left) and a slice from the centre (right). This is an extreme example because the slice on the left was taken from the very edge and it would be more interesting a few more slices in.
One way to spread the interest more evenly is to form your entire log inside out – ie into a ‘Natasha bead’ – half way through the twisting.

Less interesting scrap
Natasha beads
As long as the colours in your scrap go together, you can make Natasha Beads.

I like these ones by Cynthia Gordillo (although it appears her website is no longer live).

There are a number of tutorials on youtube – try this one for example.
Watercolor technique
This technique uses scraps in two ways – it uses very small amounts of coloured clay on the outside of the beads and also uses scrap (which could be muddy clay) for the middle. Skinner blends or a combination of some similar colours can look good.
I used Maggie Maggio’s watercolour technique, covered some beads of scrap, then made them into swirl lentil beads. However, if you are going to swirl your beads, don’t overdo it because the swirling thins the colour even further at the edges of the beads and it is easy to expose the scrap underneath.


Scrap dancing
Linzy Whiteley goes from sheet of random colours to her lovely earring design by cutting thin slices and placing in a bargello format – from polymerclaydaily.com. Watch her short video here


Really boring scrap
Make new colours
If your can put your scraps together without including too many complementary colours, you can mix some new, clean (unmuddy) colours, ready to be used in your next project. Reds and yellow become oranges, greens blues, bluey greens. However, mixing reds with greens or purple with yellows may just make muddy colours – although muddy colours can be nice.


Before you bin it
Finally, when your scrap is well past looking good, use it in the middle of your beads to save your good colours. See photo of swirl beads above where I used scrap for the middle of the beads. Similarly, you can use it on the backs of pendants or pins.
Scrap can also be useful for making moulds or providing support for some projects (for example, it can be added to the end of a very short cane to help you cut that last slice.
You can also use it for techniques where you intend to paint the finished item.
Finally, scrap techniques can extend your design options while ensuring you’re economical with your clay. However, if the pressure to use your scrap productively is standing in the way of that new project, there are worse things you can do than to dispose of the scrap and start afresh.
Pingback: Playing with ‘scrap’ clay | carolynbond
Fantastic..very inspiring visuals! Love the Scrap dancing variety!!