You can also see a video of this process here.
I generally discourage people from simply following step by step how-tos. However, making a simple flower can be a good first project, to help you become familiar with caning. It is also a good project for young people – I have done this project with groups of school children from ages 10 up. After making the flower, they are often keen to design their own canes.
Don’t worry about buying a lot of tools and supplies before you start. Buy as few as 3 blocks of polymer clay in light, medium and dark colors (I suggest one of the softer brands such as Sculpey, Premo or Fimo Soft at this stage), gather up some basic tools you have around the house and just have a go.
Conditioning
All polymer clay needs some conditioning prior to use – even if it is soft to begin with. This apparently works the plasticisers through, making the end product stronger. Take a small piece, work it with your hands, roll it into a “sausage”, fold it back on itself, then do it again. If you do this with two colors at the same time, you know it is well conditioned when the two colors become one. I’m assuming you’re starting out with one of the softer clays – if your clay is a bit hard you may need to use other techniques which may involve a pasta machine – and even a hammer! Get the feel of how the clay behaves – roll a ball, and use a pasta machine, or even a straight sided glass jar or PVC pipe to roll a thin sheet.
Leaching
The softer brands such as Premo are usually a bit too soft and need to be leached before using. Condition the clay, roll it out thinly and put between two pieces of ordinary printing paper. If you put a weight on top it should be right within half hour or so. You will see the oily substance that has leached out on the paper. Condition the clay a bit more and it’s ready to use.
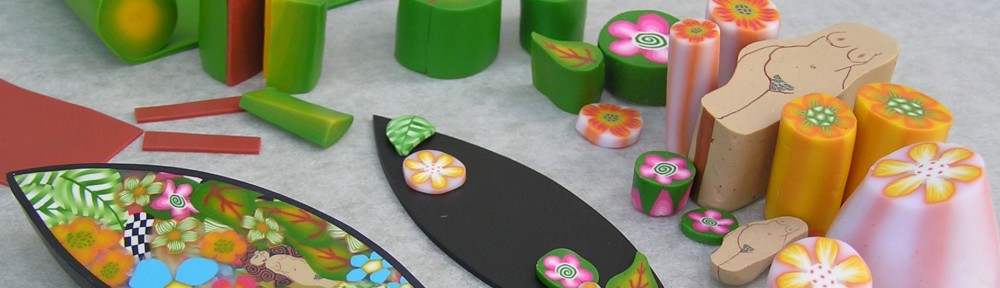
Making the cane
While the properties of polymer clay make it suitable for many techniques, I think that the quickest – and most rewarding – way to start out, is to make a simple cane.


Decide what colors you will use for the petals, background and two colored center. Roll two thin sheets of your center colors. If your clay is very sticky, put baking paper between the clay and the roller, or refrigerate it briefly. Cleaning your roller with rubbing alcohol can also help prevent the clay sticking. Place one sheet on top of the other and gently roll up into a “jelly roll”, trying to eliminate gaps (centre of third picture). Gently roll this back and forth on your board with your hands but don’t let it get too thin. Trim some off to keep – you can use as little as 1.5 inches for the flower centre. Roll out two long rolls of plain colors – one for the petals and another for the background – all about the same thickness as your “jelly roll” and about 5 times as long. Cut your petals roll into 5 pieces the same length as your “jelly roll”. Stand the “jelly roll” on its end facing you, then just place the petals around it. Make the background pieces by pinching the background roll to make a long triangle shape. Pinch the corners to make them sharp, then cut 5 pieces about the same length as the petals. Gently place the background pieces in the gaps between the petals. You may need to reshape the triangle, for example by thinning out the points so they fit between the flower. Try not to have too many gaps, but don’t worry too much, this cane is very forgiving and can still look wonderful with some distortion. Now, gently squeeze the cane in your hand, to consolidate it and eliminate gaps. You don’t want a gooey mess, so If the clay is very soft, you may put it in the fridge for half an hour to make it a little firmer.
Once the cane is together, you can start to reduce it a little. Squeeze it in your hand, and roll it gently on your work surface. You can reduce it quite quickly by rolling it, but you will waste quite a bit as the ends distort. So roll it gently, focussing on the middle to start with, pick it up and stretch it a little, then roll it some more. Once it’s reduced a little in size, cut it in half, and you’ll see the wonderful flower in the middle – even if the ends look like a mess! Keep this half (you can use the larger size slices or reduce it in the future) and reduce the other half. Again you may have enough to then cut this in half again and reduce what is left a little more.
The final picture shows the ways you can use the different sizes of jelly roll cane and flower cane – by using thick slices as beads, or by rolling a piece of clay into a ball, placing thin cane slices on the ball, then rolling it in your hands until the slices meld into the bead. You may like to use a needle to make a hole in your beads before baking, but they can also be drilled by hand with a small drill after baking. Bake your creations in the oven using the temperature recommended on the pack – take care if you think in celsius, as you’ll need to convert the farenheit temperature. You can place your beads on a piece of polyester batting to stop them going a little flat on the bottom, or fold a sheet of paper “accordion fashion” and place the beads in the “v”s (the temperature is not high enough to burn paper). String your beads or make your earrings and you have some wonderful jewelry to wear.
Clean your hands with a little water and baking soda, or with pumice, or rub moisturizer into your hands, rub off with an old towel then wash as normal.
As you practice you’ll want to refine your techniques (for example by using reduction techniques which lead to less waste on the cane ends), and there’s heaps of information in books and on the web. For this project I have tried to keep the steps very simple.
Complex canes
Complex canes come from combining your canes together. Pack 4 jelly rolls together, wrap a thin layer of another colour around them. Pack 4 flower canes together, or alternate between swirl canes and flower canes. Wrap a cane with a thin sheet of one color, then a thin sheet of another. This will “frame” the picture.
You can now start designing some of your own canes. There are lots of tutorials on the web. Caning can be addictive!
.
Pingback: Flower cane video | carolynbond
You are so clever Carolyn!!!! Thanks for sharing.